|
The Bountiful Quilt - Page 2 |
|
|
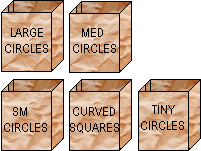
So, place all your circles done so far in the correctly labeled bag. Have a tiny circles bag standing by too. Don't have a huge stash? You can work on this quilt over time, and each time you make a project, cut some circles out of the leftovers....or beg for fabric from everyone you know!...or even...GASP...buy some if you'd like!....very random purchases though! |
|
|
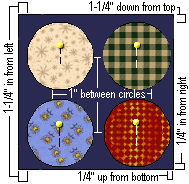
Now drawing from the top of the bags in NO PLANNED ORDER...for each "block" arrange four large circles on a 16-1/2" background square, having the top circles down 1-1/4" from the top...the right hand circles a slightly generous 1/4" from the right edge, the left circles 1-1/4" from the left edge, and the bottom circles a slightly generous 1/4" from the bottom. Pin these in place and applique on, using your choice of blanket stitch, other applique design stitch, machine invisible stitch, satin stitch, hand applique!...it's your choice... The only method I wouldn't choose for this is fusing!... |
|
|
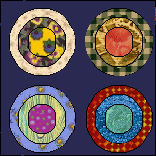
Then randomly add the medium circles centered on the circles we just did, and lastly, add the small circles... |
|
|
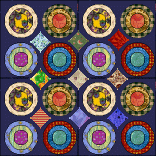
After your whole quilt's worth of blocks have their three tiered circles, sew them together into rows. Join the rows to make the entire quilt top. Once this is done, turn under the edges of your curved squares. (or if you prefer, use the interfacing method on these also) Pin one curved square between every set of four circles as shown on the smaller version at left. Appliqué using your chosen method. |
| For each curved square that you have on your quilt
top, cut one teeny circle. These can be solids, all one color, or a
variety... your choice again...To finish the edges of the teeny
circles, you may use the interfacing method, or make them like Yo-Yo's.
Sew one to the center of each curved square. ( holes up or down if
you choose the yo-yo method, again, your choice!)
... on to Page 3!
|
|
|
|
||
|
Original Block |
http://www.quilterscache.com |