| |
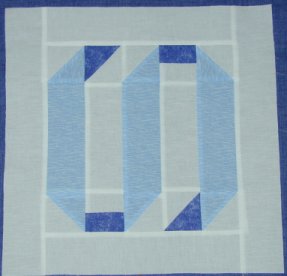
This makes a 14" block as
shown at left, but further down the page I show how to really use it as a quilt border....
:o) |
|
|
|
** Preparing the
Pieces ** |
| Color 1 needs: one strip 2-1/2" x 21" AND one strip 2-1/2" x 29" AND one strip 2-1/2" x 13" AND one strip 2-7/8" x 8-5/8" AND one strip 1-1/2" x 5" AND one 2-7/8" square |
|
|
First mark and cut the Color 1 2
1/2" x 21" strip into two 2 1/2" x 10 1/2" rectangles. Then cut the
Color 1 2 1/2" x 29" strip into two 2 1/2" x 14 1/2"
rectangles. Now cut the Color 1 2 1/2" x 13" strip into two 6
1/2" rectangles... |
| Color 2 needs: one strip 2-1/2" x 19-1/2" AND one strip
2-7/8" x 8-5/8" |
|

|
Next cut the Color 2 2 1/2" strip
into three 2 1/2" x 6 1/2" rectangles...now... |
| Color 3 needs: one strip 1-1/2" x 5" AND one 2-7/8"
square |
|
** Let's Get to the
Sewing ** |
|
|
Speed piece the half squares, by stacking the Color
1 and Color 2 2 7/8" x 8 5/8" strips right sides together and all edges
aligned. On the back of the top strip, lightly mark the 2
7/8" square lines. Mark the diagonals as shown. Now sew a scant 1/4" above and below the marked
diagonals,
pivoting at the square lines. Cut apart ON the marked diagonals between the stitching
lines, and on the square lines. Press seams towards the darker fabrics. Now repeat this
with the Color 1 and Color 3 2 7/8" squares, again sewing a scant
1/4" above and below the marked diagonal line. Cut apart on that diagonal line. This
will give you six Color1/Color2 combo squares, and two Color 1/Color 3 half squares... |
|

|
Now sew the Color 1 and Color 3 1
1/2" x 5" together along one long edge, and then press the seam allowance
towards the darker fabric. Cut using a rotary cutter at 2 1/2" intervals... |
|
|
Now starting from the left we will assemble the
blocks center. Sew two Color 1/Color 2 half squares to the top and bottom of a Color 2
2 1/2" X 6 1/2" rectangle. press seam allowances towards the
squares. This makes row 1... |
|
|
Sew one Color 1/Color 3 half squares to the top of a
Color 1 2 1/2" X 6 1/2" rectangle. Press seam allowance towards the
rectangle. Sew a Color 1/Color 3 striped square to the bottom of the Color 1 rectangle.
Press that seam towards the rectangle also. This makes row 2... |
|
|
Now sew two Color 1/Color 2 half squares to the top
and bottom of another Color 2 2 1/2" X 6 1/2" rectangle, noting direction of
squares! Press seam allowances towards the squares. This makes row 3... |
|

|
Sew one Color 1/Color 3 half squares to the bottom
of a Color 1 2 1/2" X 6 1/2" rectangle. Press seam allowance towards the
rectangle. Sew a Color 1/Color 3 striped square to the top of the Color 1 rectangle. Press
that seam towards the rectangle also. This makes row 4... |
|
|
Then sew two Color 1/Color 2 half squares to the top
and bottom of another Color 2 2 1/2" X 6 1/2" rectangle, noting direction of
squares! Press seam allowances towards the squares. This makes row 5... |
|
|
Next sew the five rows we just made together, using
all scant 1/4" seams. This completes the center of the block... |
|
|
Add the two Color 1 2 1/2" x 10 1/2"
strips to the top and bottom of the block, pressing seams towards the strips. Add the two
Color 1 2 1/2" x 14 1/2" strips to the two sides, again pressing seams
towards the strips....and you are done! |
|

|
To use this as a real border strip as long as you
would like it to be...you tuck in a new strip, that is made of a Color 1 2 1/2"
square attached to a Color 1 2 1/2" x 6 1/2" rectangle, with another of
the striped squares at the other end...then repeat ad infintum.... I drew this quilt just
to show how the ribbons look...just stuck in a center that appealed to
me...so I don't have
a pattern for that part. :o) HAPPY QUILTING!!
MARCIA :o)
Here's
one that Barb made!
here's
Karlene's done as a border strip! |
|
 Apr202000 Marcia Hohn Apr202000 Marcia Hohn |

|
|
|
Traditional Block |
http://www.quilterscache.com |
|
|
