|
Learning to Quilt |
|
Lesson Five --Making /Adding Binding! |
|
Now that your quilt top is pieced and quilted, it's time to think about Binding its Edges!! As with most other phases of Quilt making, you have Choices!
Straight Grain Binding is cut in strips parallel to the selvedge edges of the fabric, and offers the least stretch or give of all methods. (Left, above) Cross Grain Binding is cut in strips at right angles to the selvedge edges of the fabric, and offers a medium amount of stretch and give. (This is my preferred method of cutting binding) Bias Binding is cut in strips at a 45% angle to the selvedge edges of the fabric, and offers the most stretch and give of all methods. (Right, above) This is the best method if binding curved edges. |
|
|
|

|
Single Fold Bindings will provide just one thickness of fabric over the edges of your quilt, and will not wear as well as Double Fold Binding, which has double thickness. Single Fold Binding may still be the appropriate choice for some quilts, especially if corners will not be mitered, or for items smaller than bed quilts. I'll be showing Double Fold Binding from here on... |
|
Prepare the Top! |
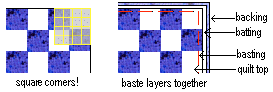 |
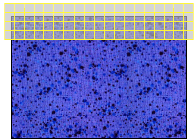
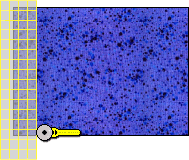
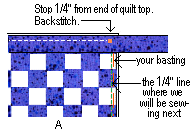
Using a square, be sure that your quilt top corners are 90 deg. angles! Trim if possible and needed. Then baste through all layers to keep things from shifting while adding your binding. After this is done, and only after this is done, I trim the batting and backing to measure 1/4" beyond my quilt top edges! |
|
How Much to Cut A good rough figure for the total length of binding you will need is to plan on the sum of all four sides of your quilt plus 12 inches. This allows extra for mitering corners, and finishing off the ends of the binding. When in doubt, plan for some extra! What Width?? Personal Choice Again! A good Average size to cut binding is between 2" for a FINISHED binding width (what you see if you look at the top of the quilt) of 3/8", to as wide as 3", for a finished width of 5/8". I cut my bindings at 2-1/2", which give me 1/2" finished bindings. |
|
How to Cut |
||
|
Straight Grain Binding |
Cross Grain Binding |
|
|
|
|
|
|
Fold pressed fabric in half wrong sides together and selvedge edges matching. Trim off selvedge edges. Using a ruler and rotary cutter, cut strips the width you would like. This would be my LEAST favorite and LEAST recommended way to cut binding strips! |
Fold pressed fabric in half wrong sides together and selvedge edges matching. Fold again, bringing folded edge up to meet selvedge edges. Have this all flat and even. Even off the left edge using your ruler and rotary cutter. Then mark and cut strips the width you would like. This Method wins my vote for Most Things! |
|
|
Continuous Bias Binding |
||
 |
Starting with a 36" square of fabric, having the lengthwise grain run evenly across the top, and all four corners a true 90 degrees, make a small mark on the left and right sides, and cut on the diagonal... | |
 |
Match the two marked sides and sew together, taking care not to pull and stretch... | |
 |
Press the seam open. Mark lines the desired width of your binding on the wrong side... | |
 |
Now bring the top and bottom edges of the unit above together to make a tube, and offset this so that the outer left edge lines up with the first marked line. Pin and sew that seam. Begin cutting where the arrow is, along the marked lines and you will be cutting one long long piece of bias binding. A 36" square of fabric will give you approx. 518 " of 2-1/2" binding. To figure this, multiply the size of the square times the size of the square. Divide that answer by the width you are cutting your binding = how many inches of binding you will get, approximately. | |
|
Sewing on the Binding |
|
|
Non-Mitered |
|
|
This is the fastest and easiest way to sew on bindings, and the way I personally prefer, for those very reasons. Patience is not my long suit :o) For a quilt that was to be in a show, or for a special gift, I would go the extra mile, and do mitered binding, other-wise, this is my favorite method! With your quilt all set to bind, line up the side bindings with the edge of the quilt top (I use DBL Fold Bindings...Single Fold is very acceptable for this type of binding), and stitch, using a 1/4" seam, all the way down the side. Repeat with another binding strip on the other side. Now turn these to the back, over the 1/4" of backing and batting you left on the edges, and stitch down by hand, using thread to match the binding and a very neat blind stitch. Cut the excess ends off even with the raw edges of the quilt. Now line up your top row of binding, having a half inch extra binding beyond the edges. Begin stitching at the edge of the quilt, and end at the other edge, backstitching at both ends to secure. Turn in the ends even with the quilt edges and turn the binding to the back. Stitch by hand as before, and stitch the ends closed. Repeat this with the bottom binding. |
||
|
Mitered |
||
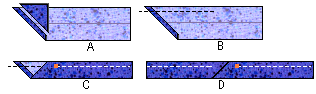 |
Starting and Stopping Beginning with Illustration A, left, open up your double fold binding. Fold in the end at a right angle, and trim off all but a 1/4". Start applying the binding to the quilt top on one side of the quilt, not at a corner! |
|
|
Lay the binding on (B), still unfolded, even with the edge of the quilt top, and begin sewing slightly before the beginning of the binding. Sew for about a couple inches. Now fold the binding back together and continue sewing on the 1/4" seam line (C). When you come back to where you started, after going all the way around (D) stop sewing as you approach the starting point, a bit over the single thickness part where we started. Tuck the end a little ways into the tube of binding, then stitch up to where you started. Hand stitch the open crossover point in thread to match the binding. Before we go any further, time to address the Mitered Corners!....so keep sewing, and... |
||
|
|
...STOP, when you get to the 1/4" intersecting point at the corner. Backstitch here to secure stitching. Remove the quilt from the sewing machine and... |
|
|
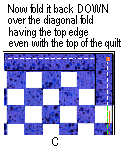
Pull the binding UP (gently!) causing a 45 degree angle fold from the bottom of the binding to the point where you stropped stitching, and a 90 degree corner at the quilt top and left binding edge... |

|
|
Now fold the binding down over the diagonal fold, lining up the raw edges of the binding with the right edge of the quilt top. Begin stitching exactly at that same 1/4" intersecting point. Backstitching at the beginning to secure, and continue along the next side. Do the same with all three other quilt corners. |
|
Now you'll turn all that binding to the back of the quilt, and hand stitch it down over the machine stitching line, using thread to match the binding, and a very tidy blind stitch. When you flip over those mitered corners, you'll notice they make a nice miter on both sides! Hand stitch the little miter seams closed. If you need help with your Blind Stitching, Read Here! |
|
|