|
 ...and
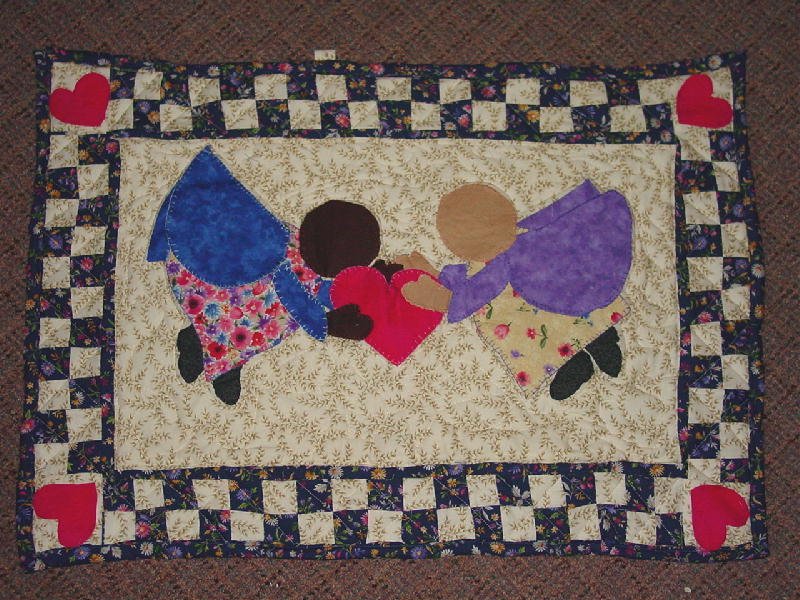
Wall hanging.... |
|
Here's an
all season angel to watch over your family and home! :o) This is an original pattern. Please abide by the Terms
and Conditions of use! :o) |
|
This one is nearly all hand
appliqué, although you can choose your own favorite method to adhere the pieces to
the background....
|
|
I am going to show not only the
block this time, but a small wall hanging as well...18 x 18...so the cutting instructions
you see next will be for both the block and the wall hanging! Remember to cut your
appliqué pieces a little larger than called for to allow for turning under scant edges!!!
This
is all done freehand....so it will be YOUR ANGEL!! :o) |
|
Your fabric one piece needs to
be big enough to cut a simple dress shape that measures roughly 4-7/8" x 5" and
one strip 3" x 12". In addition you will need two strips 1 1/2" x
48" ,and 1-1/2" x 53" for the thin border strips around
the wall hanging. Piece together smaller strips to make the length if you need to...I have
allowed some extra length here, incase you need it... |
|
|
The fabric two pieces can come
out of a rectangle that measures at least 5" x 8". Also cut two strips 1-5/8" x 26". The large wing measures approx. 4-3/4" x 3". Freehand your
self another wing top, as only a bit of it will show. The full arm is 1-1/4"
wide x 2-3/4" long. The other arm is just about a half that in length. Again, it won't
show! |
|
 |
Fabric 3 needs one 9"
square for the block background, and two 1-5/8" x 26" strips for the
wall hanging borders... |
|

|
Fabric 4 needs a rectangle
about 5" x 4". The head measures about 2 1/4", and each hand is about
1 1/2" long x 3/4" wide... |
|

|
Fabric 5 needs a rectangle
6" x 4". The big heart measures about 3 3/8" tall by 3 3/8" wide, and
the little ones are 1 1/8" tall x 1 1/4" wide. The big one and one small are for
the block, the other four small ones are for the wall hanging... |
|

|
Then, from a scrap of black
measuring at least 4" x 2", cut your self two small shoes, about 2" from toe
to heel, and about 1 1/4" from sole to shoe top. :o) |
|
|
Find the center of your 9"
background square, and center your dress shape over it. Pin in place. Tuck under the part
wing-even with the top of the dress, and Pin. Tuck under the part arm, opposite the wing;
Pin. Tuck under the shoes; Pin. Appliqué down the dress, wing, part arm and
shoes. When
appliquéing, turn under about 1/8th inch, not much more! |
|
|
Now place and pin the head,
larger wing and other arm. Sew, leaving top arm free, so you can place the heart and hands.
(you will have caught the top part of that arm down when you sewed on the
wing. Just leave
the rest pinned and un sewn for now) Tuck heart in under top arm... |
|
|
Tuck heart in under top
arm. Tuck lower hand under heart. Tuck upper hand under sleeve. Pin all of these, and sew
them down! Place additional heart slightly below the larger one, along dress seam.
Appliqué... |
|
|
Next, embroider on your face. I
suggest a satin stitch for the cheeks and eyes, and a chain stitch for the mouth. If you
prefer-cheeks could be appliquéd on-cut small circles from the excess heart fabric for
that. Large black snaps could also be used for eyes, and for the hair. |
|
and
now...the wall hanging!! |
|
|
Sew each 1 5/8" x 26"
Color 2 strip to a Color 3 strip of the same length, right sides together, using a scant
1/4" seam... |
|
Press seam allowances towards
darker fabrics then measure and cut these two color strips at 1 5/8" intervals. Sew
two of these together to make four patch squares...Make 16 of these!! Sew together
in sets of four... |
|
|
From your Color 1 fabric 3 x
12" strip, cut four 3" squares. Sew one of these squares to each end of two four
patch rows. Leave the other two four patch rows as they are... |
|
 |
Sew one of the plain four patch
rows to the top and bottom of the angel square.... |
|
 |
Sew the two four patch rows
with corner blocks attached to the sides of the angel square. Pin on and
appliqué small
hearts over corner blocks... |
|
Next sew Color 1 1
1/2" x 24" strips to the sides of the wall hanging, then add 1 1/2" x 26
1/2" strips to the top and bottom, and that's it! From this point, you would cut your
backing and batting to fit the top...quilt as desired. Make some rod holding tubes and
attach when you join your front to back.... |
|
Here's
a modified one done by Catherine!
|
and that's all for this time
people.....Hope you are having fun with all of this...remember... experiment! Express
yourself through your work! :o) Happy
Quilting!!...Marcia
 if you click on this
image...it will open to a Black and White of this block, that you can print out to use as a pattern guide for the
pieces....it is a LARGE image and will take a while to open! :o) if you click on this
image...it will open to a Black and White of this block, that you can print out to use as a pattern guide for the
pieces....it is a LARGE image and will take a while to open! :o)
|
|
|
